
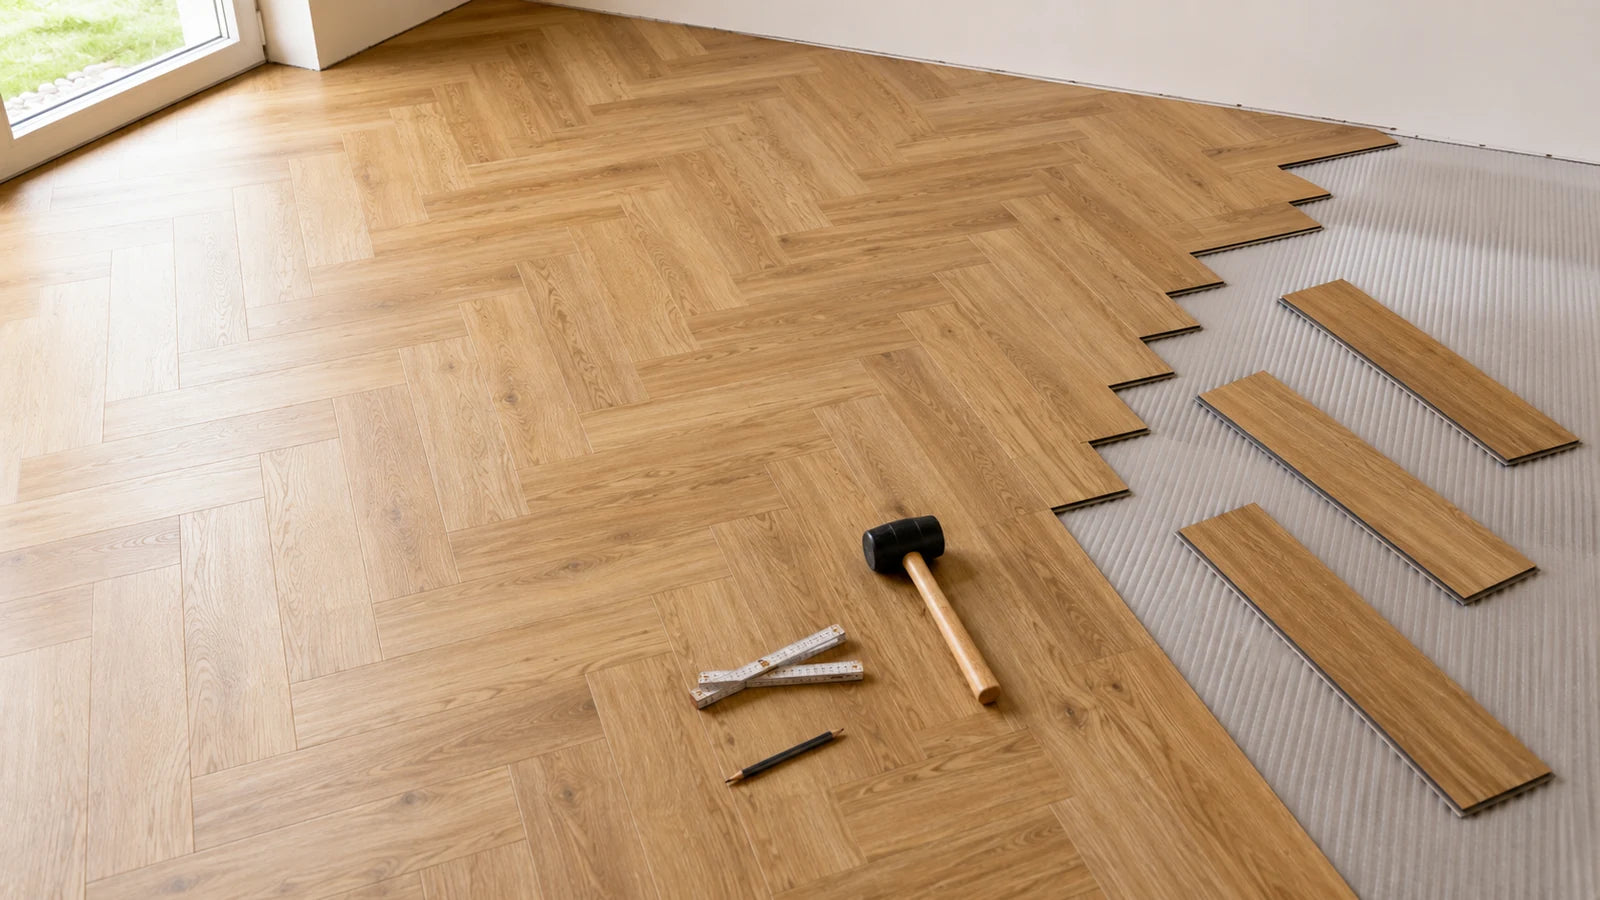
You want to install your vinyl flooring in a herringbone pattern and don't know if the extra effort is really worth it? Is the herringbone pattern worth it for vinyl flooring despite the higher waste and more working time? The short answer: yes, if you keep three things in mind: plan for waste realistically, choose the right installation system, and set up the center line cleanly. This guide will show you exactly how to do this, step by step.
Key points at a glance
- Herringbone patterns require about 15 to 20% more waste than straight installation, which you must factor in when purchasing material.
- Click-vinyl in a herringbone pattern is easier for DIY enthusiasts to install than glue-down vinyl because it compensates for small dimensional deviations.
- Measure the room diagonally before starting and mark a center line; this prevents a crooked pattern.
- For kitchens and bathrooms, dimensionally stable planks (such as COREtec or Gerflor) in a herringbone pattern are better suited than very thin vinyl.
- Plan for about one full day for the self-installation of 15 to 20 square meters, which is about twice as long as for straight installation.
Table of Contents
- What is a herringbone pattern in vinyl flooring?
- Click-vinyl or glue-down vinyl in a herringbone pattern: Which is a better fit?
- Material and tools for installation
- How much waste should you plan for?
- Step by step: Installing a herringbone pattern
- Common mistakes when installing a herringbone pattern
- What does installing a herringbone pattern cost?
- Care and longevity
- Frequently asked questions (FAQ)
- Conclusion
What is a herringbone pattern in vinyl flooring?
With a herringbone pattern, you lay rectangular vinyl planks alternately at a 90-degree angle to one another, creating a zigzag pattern that resembles a fish skeleton. The pattern originates from parquet and textile crafts and is now equally popular for click-vinyl and glue-down vinyl. Manufacturers such as COREtec, Gerflor, Tarkett, Moduleo, and Liberty offer suitable decors that you can either buy as a ready-made herringbone look or lay yourself in the pattern using standard rectangular planks. You can find more about the history and variants of the pattern at Wikipedia.
For your home, this pattern is particularly worthwhile in living and dining areas because it makes rooms appear visually larger and more high-end. You can find suitable decors in a herringbone look directly in our herringbone vinyl flooring collection.
Click-vinyl or glue-down vinyl in a herringbone pattern: Which is a better fit?
For your first own installation, click-vinyl in a herringbone pattern is better suited than glue-down vinyl because the click system compensates for small dimensional deviations at the 90-degree joints. Glue-down vinyl is less forgiving of inaccuracies, but it lies particularly flat and is a good choice if you have limited installation height available.
| Criterion | Click-Vinyl | Glue-down Vinyl |
|---|---|---|
| Suitability for DIY | Very good, click system compensates for inaccuracies | Moderate, requires precise work |
| Installation height | Slightly higher | Very flat |
| Subsequent correction | Individual planks can be replaced more easily | Only possible with effort |
| Use with underfloor heating | Possible, depends on manufacturer | Very well suited |
| Fixation during installation | Secure after clicking into place | Fixed immediately |
You can find both systems in our suitable herringbone decors: Click-Vinyl and Glue-down Vinyl.
Material and tools for installation
For a clean herringbone pattern, you need a few more tools than for straight installation. In addition to the vinyl planks themselves, you should have the following ready: a pull bar and tapping block for the click connection, a sharp utility knife or a vinyl cutter for the diagonal cuts, a tape measure and try square for exact 90-degree angles, a chalk line for marking the center line, and spacers for the edge gap to the wall. You can find suitable installation accessories bundled in our accessories collection.
For exact cuts at walls and transitions, it is worth taking a look at our guide on cutting vinyl flooring, where we explain the tools and technique in detail.
How much waste should you plan for?
With a herringbone pattern, you have to account for around 15 to 20% waste, significantly more than the 5 to 10% that is common for straight installation. The reason for this lies in the many diagonal cuts at the edge and wall, where cut-off remnants are often too small for the next row. Therefore, it is better to buy one pack more than to have to reorder in the middle of installation, especially since color batches can vary slightly.
We explain how to calculate the material requirements for your room specifically in our guide How much waste to plan for with vinyl flooring?
Step by step: Installing a herringbone pattern
- Check the subfloor: The floor must be level, dry, and clean; smooth out any unevenness with leveling compound beforehand.
- Mark the center line: Find the center of the room and use the chalk line to draw a straight line at a 45-degree angle to the wall; the entire pattern is aligned to this.
- Lay the starting triangle: The first two planks form a triangle along the center line; from here, you build the pattern in both directions.
- Build the rows: Place plank after plank at a 90-degree angle, work your way from the center to the walls, and check regularly with the square.
- Cut the edge finish: Cut the planks to size at walls and door frames, making sure to leave sufficient edge distance.
- Maintain expansion joints: Leave an edge gap of a few millimeters to the wall all around so the floor can expand during temperature fluctuations. You can find details on this in our guide on edge joints for click-vinyl.
- Install transitions and baseboards: Finally, mount transition profiles and baseboards that cover the edge gap.
- Check: Inspect the entire pattern for alignment before putting furniture back.
Common mistakes when installing a herringbone pattern
The most common mistakes occur at the beginning of the installation and then persist throughout the entire room. Acrookedly marked center line causes the pattern to noticeably run out of alignment towards the opposite wall. Underestimating waste leads to having to reorder planks from a different batch, which can make color differences visible. Lack of edge distance at the wall can lead to the floor buckling when it gets warm. And anyone who doesn't order a sample in advance often only sees the actual look and grain after purchasing the entire surface. A vinyl flooring sample in advance helps you to check the color and structure in your own lighting.
What does installing a herringbone pattern cost?
Installing a herringbone pattern costs more than straight installation, primarily due to higher material requirements and more time involved. For the material, you should count on about 1.15 to 1.2 times your actual room area due to the waste. If you hire a professional contractor, you can expect a noticeable surcharge due to the higher time expenditure compared to straight installation, as each plank must be individually aligned at an angle. If you install it yourself, you save this surcharge, but you invest significantly more time and should realistically plan for twice the effort of a straight installation.
Care and longevity
In terms of care, herringbone vinyl flooring does not differ from classically installed vinyl flooring. Regular vacuuming or sweeping, as well as damp mopping with a cleaner suitable for vinyl, is sufficient. Due to the many joints in the pattern, it is worth working a bit more thoroughly in the intersections when mopping so that no dirt settles there.
Frequently asked questions (FAQ)
Can I also glue herringbone vinyl flooring instead of clicking it?
Yes, you can. Glue-down vinyl lies particularly flat and is well-suited if there is little installation height available, but it requires more precise work than click-vinyl because small dimensional deviations can no longer be compensated for.
How much waste must I plan for with a herringbone pattern?
Expect about 15 to 20% waste. This is significantly higher than the 5 to 10% common for straight installation because many diagonal cuts are required at walls and edges.
Do I need special tools for a herringbone pattern?
In addition to common installation tools like a pull bar and tapping block, you need a try square and a chalk line to precisely mark the center line and the 90-degree angles.
Does a herringbone pattern fit in every room?
Basically yes, but it looks particularly good in larger, cohesive areas like living and dining rooms. In very small or highly angled rooms, the pattern quickly looks restless due to the many cuts at the walls.
What does installing a herringbone pattern cost compared to straight installation?
Expect noticeable extra costs compared to straight installation, both in terms of material due to higher waste and in terms of labor time. For self-installation, the time expenditure is the main factor; if you hire a professional, the labor cost is an additional factor.
Conclusion
Installing vinyl flooring in a herringbone pattern is not rocket science, but it requires more care regarding the center line, waste, and edge distance than a straight installation. With click-vinyl, the right tools from our accessories collection, and realistically planned material requirements, nothing stands in the way of a successful result. Technical background information on installation standards is provided by the Federal Association for Screed and Flooring (Bundesverband Estrich und Belag), which, among other things, monitors the standards for flooring work.
Ready for your herringbone pattern?
Discover our vinyl flooring in a herringbone look and order samples in advance: 3 pieces for €19.95, fully credited upon purchase.
Discover vinyl flooring now